Getting Started Guide
Step 1: Getting Minecraft: PC vs. Consoles
PC (Windows / Mac):
- Visit the Official Website: Open your web browser and go to the official Minecraft website at https://www.minecraft.net/.
- Choose Your Edition: On the homepage, you'll see various editions of Minecraft available. The two main editions are "Minecraft Java Edition" and "Minecraft for Windows 10." Here's how they differ:
- Minecraft Java Edition: The original version of Minecraft for PC, compatible with both Windows and Mac. It has robust modding support, custom servers, and access to older snapshots.
- Minecraft for Windows 10: Also known as Bedrock Edition, designed for Windows 10 computers and can be found on the Microsoft Store. It supports cross-platform play with other Bedrock Edition players on consoles and mobile devices.
- Purchase the Game: Click on the edition you want to purchase. This will take you to the corresponding page where you can buy the game. You'll need to create a Mojang/Microsoft account if you don't have one already.
- Download and Install: After completing the purchase, download the Minecraft installer for your chosen edition. Run the installer and follow the on-screen instructions to install the game on your PC.
- Log In and Play: Once installed, launch Minecraft and log in using your Mojang/Micorsoft account credentials. You're now ready to start playing Minecraft on your PC!
Consoles (PlayStation, Xbox, Nintendo Switch):
- Access the Console Store: Turn on your gaming console (PlayStation, Xbox, or Nintendo Switch). Access the respective store for your console (PlayStation Store, Microsoft Store for Xbox, Nintendo eShop for Switch).
- Search for Minecraft: Use the search function within the store to find "Minecraft."
- Choose the Edition: Unlike PC, there is mainly one edition:
- Minecraft: This version is commonly known as "Minecraft: Bedrock Edition" on consoles. It allows cross-platform play with other Bedrock Edition players and supports various features, including the marketplace for skins, texture packs, and worlds.
- Minecraft: Java Edition is not available on consoles; it is exclusive to PC.
- Purchase and Download: Select the edition you want to buy and proceed with the purchase. You may need to sign in with your console account. Once purchased, the game will automatically download and install on your console.
- Launch the Game: Locate the Minecraft icon on your console's dashboard or home screen and launch the game.
- Start Playing: Log in with your Microsoft account (for Xbox) or Nintendo account (for Switch) to access online features. You can now begin your adventure in the blocky world of Minecraft on your console!
Step 2: Starting a New World:
- Launch Minecraft: Open the Minecraft launcher on your PC or console.
- If you are using the launcher on PC make sure the correct version is selected on the left. Then that the release is the latest release, and finally click the play button
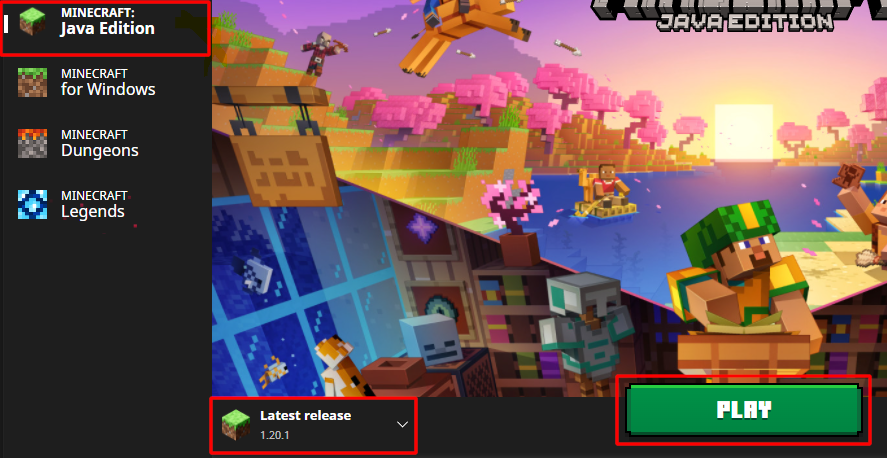
- Create a New World: Click on "Singleplayer" and "Create New World" to generate a new world. Choose a world name and customize other settings, such as the game mode (Survival or Creative) and difficulty level. Survival is considered the default game mode but if you want an easier experience mainly geared towards building only then you can choose Creative. For your first world it's recommended to use all the default settings.
- Generating the World: Once your world is created, Minecraft will generate a unique landscape for you to explore.
Step 3: Basic Controls and Movement:
- After the world is done generating you will be dropped into your newly created world.
- PC and Consoles: Use the WASD keys (or joystick) to move forward, backward, left, and right. Press the spacebar (or A on consoles) to jump. Use the mouse (or right joystick) to control your view.
- Mining and Placing Blocks: Use the left mouse button (or corresponding button on consoles) to mine blocks. Aim at a block and click and hold to break it and collect resources. Use the right mouse button (usually Left trigger on consoles) to place blocks. Select a block from your hotbar and click to place it. If you want a detailed guide on the default control setup for PC and consoles you can go here: https://www.minecraft.net/en-us/article/minecraft-controls
Step 4: Surviving Your First Night:
- Gather Resources: In the daytime, explore your world to collect essential resources like wood, coal, and food (meat, berries, etc.). Craft tools and weapons using the crafting table to make your survival easier.
- Building Shelter: As the sun sets, monsters will come out. Build a simple shelter to protect yourself. Dig into a hillside or build a small hut.
- Lighting and Safety: Use torches or other light sources to keep your shelter well-lit and prevent monsters from spawning inside.
- Here is a basic breakdown of exactly what to do and gather before the first night that comes in about 20 minutes:
- Punch about 3 trees and harvest its wood. You will need to hold click on the trunk of a tree until the block breaks and falls on the ground. Walk near the dropped wood to pick it up. Do this for each section of the trunk for about 2-3 trees.
- Craft your logs into planks. Open your inventory by pressing E and then click your logs and then click one of the 4 squares under 'Crafting'. Then click the planks that appear to right and then click an empty space in your inventory until all your logsare used up.
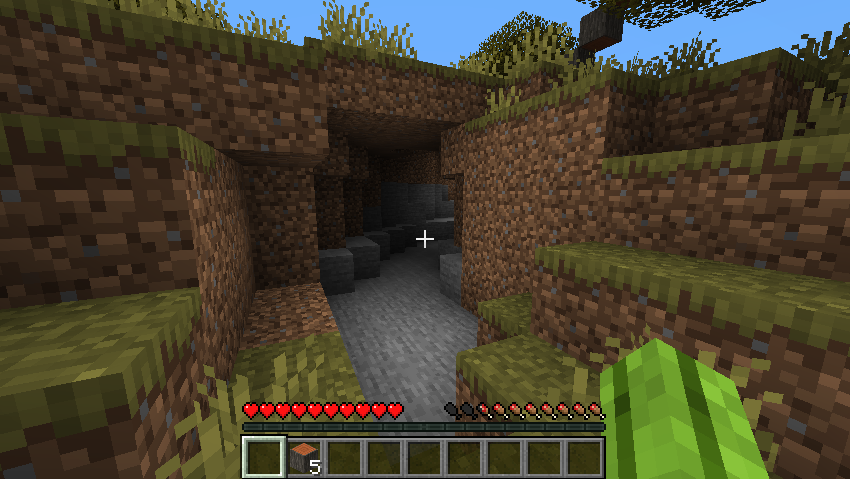
- Search for a place to hunker down for the night. A good place would be a place with some combination of walls and ceiling, like a small cave or overhanging cliff. If you choose a cave that goes deep into the earth, be sure to wall off the tunnel with some blocks. You could also build a simple hut. Below is an example of a good spot because it's a small cave with both ends leading to the surface, so all that needs to be done to make it safe is wall off both ends with blocks and place a few torches inside to keep it lit.
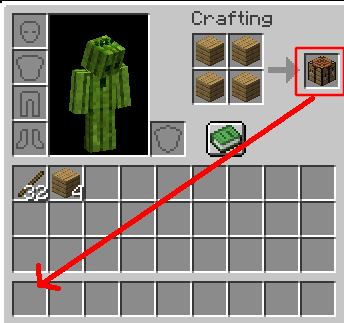
- Craft a crafting bench. Put one plank in each of the crafting boxes, and then take the new crafting bench and put it in one of the boxes on the bottom row of your inventory as seen in the image below. Then exit your inventory with E, and select the crafting bench with your mouse wheel. Then place the crafting bench down in your base by looking at a block near you and right clicking. If you try to place it too close to you it will not work.
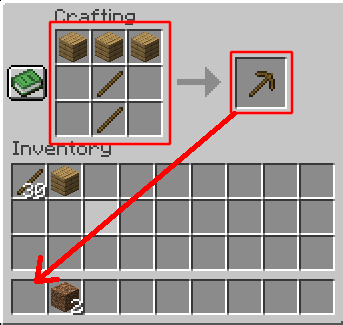
- Craft a pickaxe. Right click your new crafting bench on the ground. This crafting window uses a 3x3 box and is where you will craft mose items. To craft a pickaxe first make some sticks by placing two planks on top of each other in the crafting box. Get the sticks and then place 2 sticks and three planks like in the below image. Then put the pickaxe in one of your active slots like we did with the crafting bench.
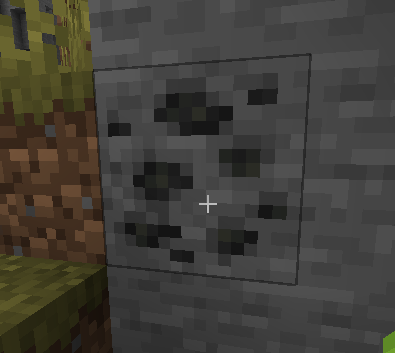
- Look around your area for some coal. Coal blocks look like gray rock with black splotches in it as seen below. Try looking for coal on exposed rock and cliffs. Mine it with your new pickaxe by selecting the pickaxe with mouse-wheel and then hold click on the coal block.
- Craft some torches. In your inventory, craft a torch by putting one coal on top of one stick in the crafting box. Then put the torches in your active slots and place them in your base/bunker.
- Tip: You can craft many instances of an object at once by putting multiple instances of the required materials in the crafting box.
- Also, there are some ways to move items in your inventory around faster. Left clicking items in your inventory will pick up and drop the entire stack of items. Right clicking a stack will pick up half of the stack. Right clicking while holding a stack will drop only one item from the stack. Shift clicking an item will automatically move it to the first open slot in your inventory, it will also auto craft as much as possible if you shift click the crafting output.
- Explore with remaining time. With your remaining time until night feel free to roam around gather resources and explore the area, just be careful not to venture too far. When night comes be sure to close up your base and wait inside until night is over, and the creatures of the dark go away. Many players opt to dig down into the ground and start a mine in search of materials suring the night.
- Have Fun exploring a new world! With these steps you should easily survive your first night in Minecraft. Have fun in these vast lands, crafting new items and discovering all the depth and gameplay mechanics of Minecraft!
